Image generation
The core image nodes. All of them take a prompt (and, where relevant, images) and produce an image on a provider of your choice.
Text → Image
Generate an image from a prompt. Pick a provider and model, set the aspect ratio and (on Gemini) the resolution, wire a prompt in, run. This is the starting point of most graphs — see Your first image. A ratio a model does not render at the chosen size is greyed in place with the reason (Ideogram 4.5 has no 21:9 at 1K: pick 2K).
Providers: Gemini (Nano Banana family), OpenAI (GPT Image 2, plus GPT Image 2.5 Flare and Sunburst; the 2.5 pair unlocks two extra quality steps, xhigh and max, on the quality select) and Seedream (BytePlus's Seedream 5.0 Pro, Flash and Lite, on the Seedance key: 1K / 1.5K / 2K, Lite 2K / 3K / 4K, from $0.018 per image; you get exactly the size you pick).
Every image node's footer shows its result's resolution (2048 × 1152, · ×4 on a batch) at the bottom left, on the output pin's row, the real pixel size of the file, not the preview's. Every image node's title bar has ▶ (run this node and what it needs; unchanged inputs replay the last result, free), 🕘 (history: every past result, pin one) and ↻ re-roll (a fresh take with the same inputs: bills again, the current take stays in history). See Never pay twice.
Image → Image
Edit or transform an existing image with a prompt. Wire an Image In (or any upstream image) into the image inlet and a prompt into prompt. Good for variations, retouching, and style changes.
With nothing wired into image, the node renders the prompt as text-to-image on the same model (when the model offers it) and says so in the activity log; an aspect of auto then falls back to the model's own default aspect, since there is no input to follow.
Size on Seedream: Same as the picture. On the Seedream models the Size menu of this node, of Inpaint, of Compose and of Annotate & Correct opens with Same as the picture, and it is the default when you switch the node to Seedream: the edit comes back at the input's own pixel dimensions (on Compose, the scene's), so nothing has to be scaled or cropped when it is laid over the original in a Layers or Compare node. (The model still redraws the frame: the result can sit a few pixels off, see Annotate & Correct.) The model's range decides how far that holds: Pro and Flash render 0.9 to 4.6 MP, Lite 3.7 to 16.8 MP; a picture below the range comes back at the model's smallest size, one above it at its largest, with the proportions kept. Pick a size from the menu to resample on purpose. See Seedream.
Gemini gotcha: Gemini sometimes sends back no picture and no reason: that is a silent refusal (shown as
OTHERorIMAGE_OTHER), usually triggered by an input image (a real person's name in facade lettering, a face, a logo), not the prompt. It happens again every time, so Brut doesn't retry it. Fix by removing or cropping the offending image.
Inpaint
Steer an edit to a painted region of an image. The mask tells the model where the change goes; it doesn't lock the rest of the picture (see what the mask does and does not do below). The mask editor works like the Layers editor: wheel zooms at the cursor (up to 12×), middle-drag pans, Fit (or 0) resets, the brush circle under the pointer shows the real size, [ / ] and Alt+right-drag resize it, B / E switch brush and eraser. On OpenAI the output comes back at the input's own size (a 2K render stays 2K).
- Wire an image into the Inpaint node and run upstream once so it has an output.
- Click 🖌 Paint mask to open the mask editor. Brush over what should change (red overlay), at the image's native resolution. Erase to correct.
- Type a prompt describing the change and run.
- Shift+click draws a straight stroke from the end of the last stroke. Chain Shift+clicks to trace a window frame or a column edge.
- Ctrl+Z undoes a stroke (or a Clear), Ctrl+Y or Ctrl+Shift+Z redoes it. The ↶ ↷ buttons in the bar do the same. These keys belong to the editor while it is open, so they never undo a step on the canvas behind it.
- Pen pressure sets the stroke width on a tablet: a light touch paints thin, full pressure paints the brush size. Untick pen pressure for a constant width (the choice is remembered). After each stroke the bar shows what Brut received, for example
pen · 78 %. If a tablet showsmouse · no pressure, its driver is sending mouse events: turn Windows Ink on in the tablet settings.
↳ Inpaint result (under the result) starts the next pass on that result. It places a new Inpaint node wired to this node's output, with its own Prompt node holding a copy of this prompt, and opens the mask editor on the result. Paint the next region, edit the new prompt, run. The first pass stays as it is and is not billed again, and each pass keeps its own mask and its own 🕘 history.
What the mask does and does not do
The mask steers the edit; it doesn't lock the rest. Every provider redraws the whole image, so the area outside the mask comes back close to the original but not pixel-identical: fine texture changes everywhere, and sometimes structural changes near the edit (a window mullion redrawn, a door frame half kept). This is true of every provider, OpenAI included, and OpenAI's own guide says so: "Masking with GPT Image is entirely prompt-based."
- On OpenAI and Gemini alike, the mask guides the edit; neither confines the change to the painted pixels.
- On Ideogram 4.5 the mask is a real mask: Ideogram paints inside it and keeps the rest, and the result is always the picture's own size (the Size menu stays on Same as the picture beside a mask). Ideogram 4.5 Precise Edit goes further: the picture comes back at its exact size and every pixel the edit did not touch is copied from the original, mask or not (measured on a sofa recolor: 95 percent of the pixels came back identical, byte for byte).
- Paint the whole object you want changed, with its shadow or reflection and a small margin. A thin stroke on one edge of an object leaves the model to guess the rest, and it will change pixels outside the mask to finish the job.
- Need the rest pixel-exact? Wire the original and the result into a Layers node, with the original as the base, give the result layer a black mask (Alt+click + mask) and paint it white over the region you wanted changed. Everything outside comes from the original, locally and for free.
- If you reach Nano Banana through fal.ai or Replicate instead of your Google key, inpainting still works. Inpainting on GPT Image needs your own OpenAI key.
- The mask remembers which image it was painted on; if the input changes, the run stops with a clear message ("repaint") rather than applying the mask to the wrong region.
Annotate & Correct
Point at things on the image and say what changes — Inpaint's smarter sibling, and the way clients already brief: markup on a picture.
- Wire an image into the Annotate node and run upstream once so it has an output.
- Click ✏ Annotate to open the editor. Draw arrows (point at the exact object), boxes / circles (hold Alt to draw from the center), a freehand lasso or a click-placed polygon (click corners; close on the first corner or double-click — Backspace undoes a corner, Esc cancels), or drop a numbered point marker. Give each mark a note ("change this chair to a deep red", "remove this lamp") and, optionally:
- a color chip — pick on the color wheel, browse the RAL Classic swatch grid (216 colors with search, the archviz-native vocabulary clients actually speak; screen colors approximate the physical RAL chips), or use the eyedropper to sample a color straight from the image ("make it THIS color");
- a reference image — drop or browse an image onto the mark's card: "replace THIS with the object shown". References are lettered (A, B, …) in the editor. Exotic formats (AVIF from a Google Images drag, for instance) are converted automatically.
Each model gets your marks in the form it reads best, and the result always comes back clean, with no markers in it.
Seedream on this node
Pick Seedream (BytePlus) as the provider: Pro and Flash are on the menu (Lite doesn't follow marks and stays off). On a test interior with five marks, one of each kind (recolor the sofa to a RAL green, remove the coffee table, hang a painting at a point on the wall, lay a rug inside a circle, fill a shelf outlined with a lasso), then with a reference armchair placed in a box:
| Seedream 5.0 Flash | Seedream 5.0 Pro | Nano Banana 2 | |
|---|---|---|---|
| The five edits | all five, each at its mark | all five, each at its mark | all five, but the painting on another wall and the rug three times the circle |
| Size of the result | 2048 × 1143, the input's own | 2048 × 1143, the input's own | 2752 × 1536 |
| Sofa color vs the RAL asked (#114232) | #264933 |
#164335 |
#344d41 |
| Cost and time | $0.018, 21 s | $0.045, 41 s | $0.10, 16 s |
One scene is not a ranking, and Nano Banana Pro was not in that run. What it does show: on Seedream an edit lands where you marked it, the result comes back at the picture's own dimensions, and a correction pass on Flash costs under two cents.
- Size: Same as the picture. On Seedream the node's Size menu opens with it, and it is the default: a 1376 × 768 picture comes back 1376 × 768, so nothing has to be scaled when the two are stacked. It holds for pictures between 0.9 and 4.6 MP; a smaller one comes back at 1K, a larger one at 2K, the model's limits. Pick 1K, 1.5K or 2K instead to resample: the picture's proportions are kept to the pixel (1376 × 768 at 1.5K is 2064 × 1152, exactly one and a half times). A result at another size than its input still reconciles.
- The same size is not the same pixels. The model redraws the whole frame, as every generative edit does: the result can sit a few pixels off, with grass and foliage re-rendered. You see it as a slight jump in a Compare wipe. Where the rest must stay exactly as it was, use 🗇 Reconcile with input (below): it lays the result back over the original and keeps only the edits, so everything else is the original's own pixels.
- No 4K here. Seedream 5.0 Pro and Flash render up to 4.6 MP (2K); only Lite goes to 3K and 4K, and Lite doesn't follow marks, so it is not on this node. For a 4K result, correct at the picture's size and finish with an Upscale Image node.
- A mark that touches several things: name the one you mean in the note ("the lamp on the left"), even when a lasso is drawn tightly around it.
- A reference image on a mark is one more input: on Pro each input after the first adds $0.003; on Flash inputs are free.
- Up to 9 reference images.
- Through an OpenRouter key the node reaches the same models, at OpenRouter's sizes (1K / 2K).
Notes:
- Nano Banana 2.1 (the node's default, Nano Banana 2's successor), Nano Banana 2 & Pro and GPT Image follow drawn instructions well, reference images included. On our five-mark test room, 2.1 put every edit where its mark was drawn (the painting on the marked wall, a rug the size of its circle, the vases inside the shelf), three things Nano Banana 2 had got wrong on the same marks. The original Nano Banana applied only some edits and left markup in the output when we tested it, so it is deliberately not on this node's menu. Nano Banana Pro is the strongest multi-mark performer among Nano Banana and GPT Image; GPT Image is best with a handful of marks at a time.
- Aspect auto keeps the input image's shape on Gemini, whatever the reference images look like.
- Reference images go through the same content filters as everything else: a photo of a real person (children especially) can trigger a Gemini safety refusal; the node shows it. Swap the reference.
- Marks are strong guidance, not a hard mask, and the model redraws the whole image (Inpaint's mask doesn't lock the rest either). When the untouched areas must stay pixel-exact, use 🗇 Reconcile with input under the result (see below).
- Annotations remember which image they were drawn on. If the input changes, the run stops with a clear message ("re-anchor") instead of applying the old marks: reopen the editor and mark the new image.
- Marks stay fully editable: reopen the editor and use Select — drag a mark's number to move it (for arrows the number moves just the tail, the tip has its own handle to re-aim, and dragging the shaft moves the whole arrow), edit notes/colors, or delete (✕ or the Delete key). Any edit means the next run is billed again.
- The marks belong to the picture, not to the model: switch the node between Nano Banana, GPT Image and Seedream and the same marks run again on the new model, with nothing to redraw.
- Annotations aren't saved into library items: they're anchored to a specific image.
- Correcting a result you mostly like: don't re-roll the same node — every mark would regenerate and the parts you approved come back similar, not identical. Click ↳ Correct result instead: it spawns a new Annotate node wired to this result, so the approved image becomes the frozen input and only the correction re-bills. And when what you want is the original, with only the edits, click 🗇 Reconcile with input.
Reconcile with input
A generative edit redraws the whole picture. Even when the result has the same size as the input, everything in it has moved a little (a few pixels) and has been re-rendered in detail, with small tone shifts on top. 🗇 Reconcile with input, under the node's result, gives you the picture you actually wanted: the original, pixel for pixel, with only the edits in it.
One click spawns a Layers node, already set up and composited:
- The original is the base. Everything the edit did not touch stays the original's own pixels.
- The result sits on top, lined up with the original, so an edit meets its surroundings without a step. The layer's row says aligned.
- A mask shows only the edits you asked for: the new object, the opened door, with a little room for a shadow. Everything else stays the original's.
- The Annotate node's own result is not changed. The aligned picture is a separate file that only the Layers node uses; anything else wired to the Annotate node keeps receiving the model's picture as it came.
- Free and local. No provider is called; it takes a few seconds.
- The picture comes out at the original's size. If the model returned another size (Nano Banana at 2K on a smaller input, say), the result is fitted to the original first.
- When the two pictures can't be lined up (they have little in common), the result stays as it is and Activity says so; when no change shows at your marks, the mask starts empty and you paint it.
Layers
Photoshop-style compositing, local and free — the node never calls a provider.
Wire two or more images in (the bottom wire is the base), then open 🗇 Edit layers & masks. The layer tray speaks Photoshop:
- A layer has no mask until you add one — + mask on its row (click = white, reveal-all; Alt+click = black, hide-all). The brush paints the mask: white reveals, black hides — the dual swatch shows both colors (active one outlined), X swaps, D goes back to white. Alt+Backspace (or Shift+Backspace) fills the whole mask with the selected color, Ctrl+Backspace with the other one — Photoshop's foreground / background pair.
- Brush opacity is per-stroke (1–100%): overlapping segments inside one stroke never build up. Set it with the slider or digit keys —
5= 50%,1then2quickly = 12%,0= 100%. (This is the stroke's opacity; the layer's own is on its row, below.) - Alt + right-drag adjusts the brush — horizontal = size, vertical = softness — with the cursor pinned in place while you drag (like Photoshop);
[and]step the size. Size, softness and opacity all have sliders too, and the live brush cursor shows the soft edge as a dashed ring. Shift+click on the image draws a straight stroke from the last stroke's end; Alt+click picks the mask's level under the cursor (white or black) as the paint color. - Each row: eye toggle (Alt+click = solo — hides the others; again restores), layer thumbnail, B&W mask chip — Shift+click (or Tab+click / right-click) the chip to disable the mask (red ✕, layer shows fully), Alt+click to view the mask full-frame, Ctrl+I inverts the selected mask — and the layer name (double-click to rename). Below: the layer's opacity (0–100 %: the layer shows through, so you can see what is underneath — the final composite applies it exactly the same way), feather, invert, remove mask. Drag rows to reorder; the tray under the stack duplicates (Ctrl+J), deletes (duplicates) and moves the selected layer.
- Undo inside the editor: Ctrl+Z / Ctrl+Y (or Ctrl+Shift+Z) and the ↶ ↷ buttons in the tools bar step through strokes, fills, masks added or removed, layer settings and order — one step per slider drag or row drag. The canvas' own undo never fires while the editor is open. ? opens the full shortcut table.
- Pen pressure (Wacom & co) scales the stroke width automatically.
- Wheel zooms (past ~1.5× the preview switches to full native resolution), middle-drag pans.
Why it matters beyond convenience: generative edits keep "everything else unchanged" only approximately — the whole frame regenerates and untouched regions drift subtly. Layers clamps every unpainted region back to the source pixels. Stack the original under a generation, mask in just the part you wanted changed, and the deliverable is pixel-faithful everywhere else.
- A layer tagged aligned (the result layer of Reconcile with input) stays lined up with the base as long as that base is the bottom of the stack.
- The base defines the canvas. A layer of another size auto-fits: scaled to cover and center-cropped — never distorted (the editor labels it "auto-fit"). This is the common case: a 4K generation never exactly matches its source's dimensions. Masks stay strict: an outdated mask stops the run with a clear message, never applies misaligned.
- Masks remember which image they belong to. If an upstream node re-generates (new output), the run stops with a clear message instead of silently applying or dropping an outdated mask — reopen the editor to repaint.
- ✓ Use this stack composites right away: the node's face shows the result the moment the editor closes — there is no ▶ on a Layers node (nothing upstream is run or re-billed; a whole-graph ▶ Run still passes through it for free). The composite is kept like any node output, and re-runs are free anyway.
- Layers or Sketchpad? Layers reconciles finished images (masks between versions, after the generation). The Sketchpad makes an image by hand to generate from (draw, place, arrange, before the generation).
- The other way round: Decompose result… Once the node has a result, the button under it sends that flat picture to Seedream 5.0, which splits it into a base and up to 16 layers with transparency, landed as a new Sketchpad next to the node. It is the one paid action here (the price is shown first) and needs your own BytePlus key; without it the button is greyed and says why. The same action sits on every picture's right-click menu.
Compose
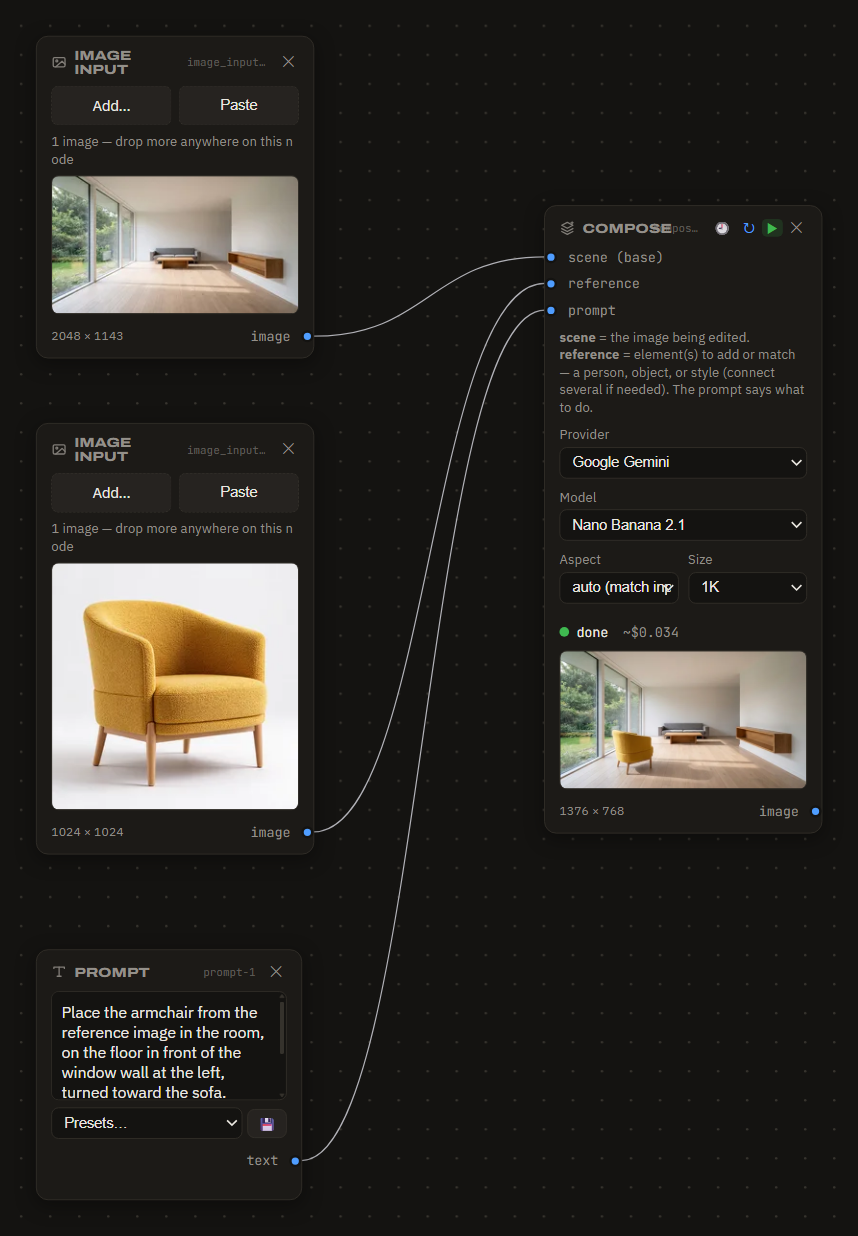
Blend a scene with one or more reference images. Wire the base image into scene, the sources you want to pull from into reference, and a prompt describing the blend. Compose is handy for dropping entourage, materials or mood from references into a render.
The same pass can borrow the reference's camera too: the Grade & camera match preset asks for its "filmic point of view" as well, and the shot is reframed to the reference's way of seeing — angle, symmetry, distance — while the building stays yours. For example, a daytime pool shot became a frontal mirror composition in one call.
Choosing a model
The menu always lists the current models, each with its default settings. Cheapest-to-richest on Gemini: Nano Banana 2 Lite ($0.03, text-to-image only: it can't edit) → Nano Banana 2.1 ($0.034 at 1K, up to 4K, edits and up to 14 references) → Nano Banana Pro (up to 4K). Nano Banana 2 is still on the menu but retires on 29 October 2026; Nano Banana 2.1 replaces it. For edits, the original Nano Banana (~$0.04) is still the cheapest and stays on the edit menus. On the BytePlus key, Seedream 5.0 undercuts all of them: Flash at $0.018 per image for exploration, Pro at $0.045 (2K $0.09) for photoreal keepers, Lite at $0.035 up to 4K. A text-to-image picture of people from any of the three (Pro, Flash or Lite, the whole picture) is accepted by Seedance as a start frame or reference; Seedream edits and crops are refused. On an Ideogram key, Ideogram 4.5 is the pick for lettering and layout, and Ideogram 4.5 Precise Edit for a correction that must leave the rest of the picture exactly as it was. See Providers for the full list and billing notes.
Next
→ Multi-Shot & boards — explore many viewpoints at once.